Others
30 June 2021
Improve Your Design Process
The hardest part of working as a junior UX or UI designer isn’t its tiring design process, it's the wait you do before starting your work. This is that time when you have no clue what to do or how to begin the project. You’re stuck at a stalemate, where you can’t move forward because you have no idea what to do and you can’t go back because you’ve promised your client that you’ll make them a product. However, even if you manage to get your ideas straight about what type of design you want to go for, you are now stuck in actually designing the product and you can’t seem to design a product that the customer wants because you might not have the skill-set to do or the tools to make it happen. However, it is easy to manage the design once you know what to do, how to do it and most importantly if you’re able to do it.
To make your design process easier you should follow an organized structure for your design process that can serve as a guide to help you when you get stuck in the design process. Below is an image of the process explaining in steps how you should go about your design process:
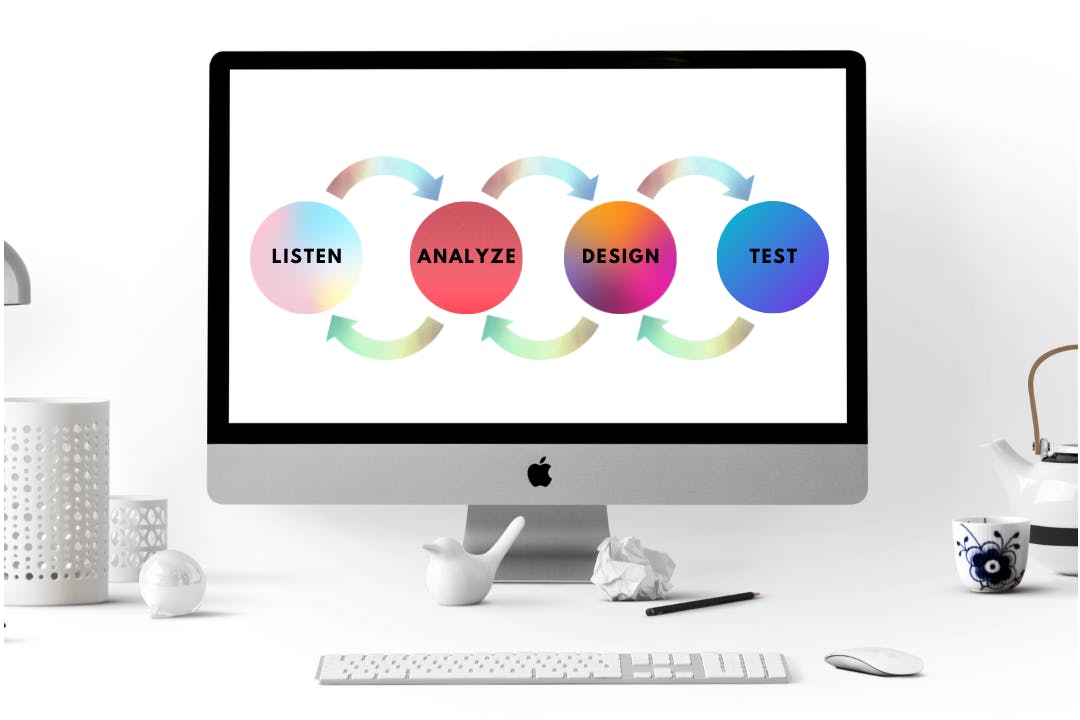
1. Listen to the Client:
The first most crucial step towards designing a product be it for anything it is important to actively listen to the client, this is not only important to maintain a healthy client relationship but it is also important in your design process. We believe that the reason why most designs don’t turn out the way our clients expected them to is due to designers not fully understanding what the client actually wants. It’s not that the designers don’t listen to the client, it’s just that the way each client explains something is different because we all have our own way of understanding things and this affects our design process. The only way to solve this problem is to really understand what the client wants from you and what they expect for you to provide them with. Get to know your clients, ask a lot of questions, build a strong relationship with them and understand them flawlessly.

2. Analyze the Project:
The second most crucial step in the whole design process is to evaluate whether or not the project at hand is possible or not. One of the most important things to note in this step is that this should always be done and in sequential order to the listening to the client part because as the designer it is our job to identify any implausible ideas that might not be possible within the client’s budget or due to any reason and suggest an alternating solutions. It is also important to note all the problems that may arise during the later phases of the project and inform your client about them in due time. If when analyzing the project you feel like something won’t be possible or you find a problem you should immediately consult with the client and explain the problem and clear your queries.
3. Design the Product:
Now finally comes the main part, the one we’ve all been waiting for, actually designing the product. To put it abruptly, there is no shortcut to designing how your website will look. It’s not like we can tell you this is how you need to design this and you start working. Designing is a combination of art and science, and with every art it depends on the artist on how he/she goes about their artwork and presents an end product to the client. However, the main variables required by the client are still there, what we’re talking about is the actual creativity that is involved in the design process that will define the project and give it life, your life. The essence of this part is that you know how to design the product and now's the time to use those skills to make that product for your client. If designing the product seems difficult go back to the 2nds step and analyze the project again.
4. Test the Product:
Lastly, before you complete your project and submit the design to your client it is important to first test the product to see if all the elements in the design are interacting with one another successfully. The last thing you want is to deliver a product that keeps on crashing and keeps disturbing your client. If the test proves your design to be correct then well and good however if it proves that the design is flawed and the product will eventually crash then you can evaluate your project on either of the previous three steps based on the severity of the problem.
Conclusion:
An important thing to note after all this is that this process is not final. Like we said earlier this model will only serve as a guide to organize your work so that you don’t get stuck at any stage and easily compartmentalize your work and rather than letting it drive you, you drive it. One more thing to add here is that these stages mentioned may not necessarily work for you because every project has its own challenge. These challenges will work for the majority of your projects, however the essence of this is to show you that when you organize your tasks you make your work easier for yourself and ultimately end up improving your design process which will ultimately improve our design itself.

